How it works
Acepick is your go-to platform for finding the right professionals for any job across all professional sectors in Nigeria with a diverse range of professionals and a commitment to transparency and security, Acepick makes hiring professionals and managing projects easier than ever before.
Users and Roles
Client
- Login/Register
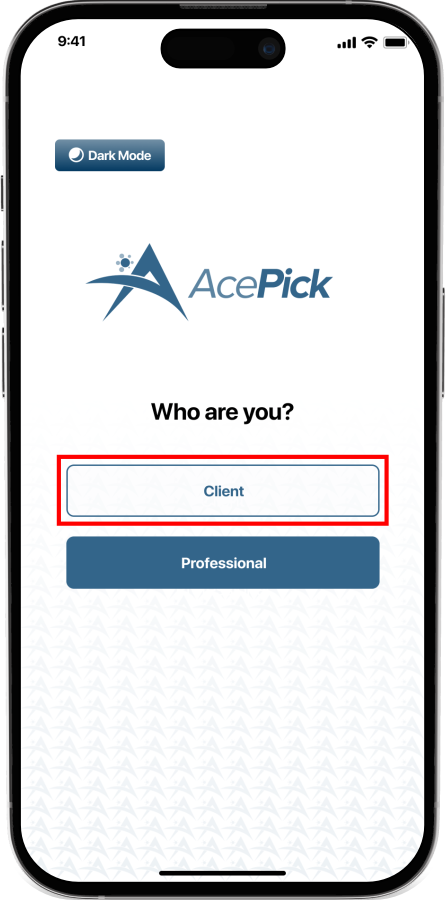
After the Splash screen, this page appears, as a client, you will tap on “Client”. You can tap the Dark mode button at the top left to switch to dark mode.
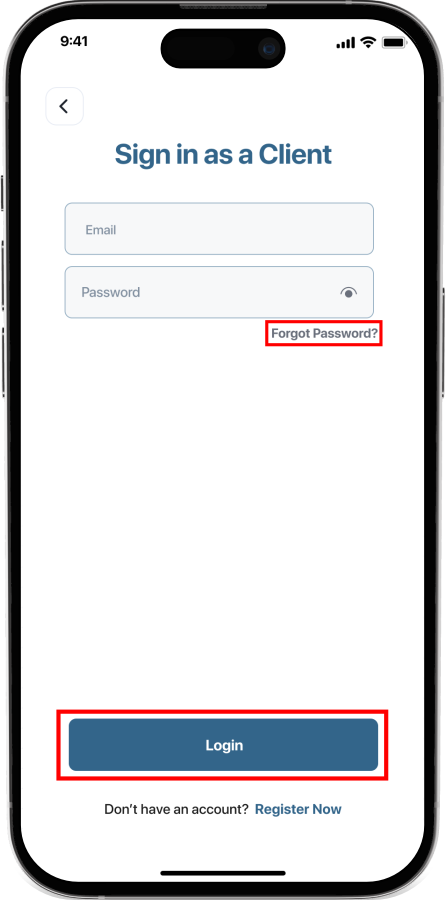
Provide your login credentials to login to your dashboard of the app. Tap forgot password to reset your password if you cant remember your password.
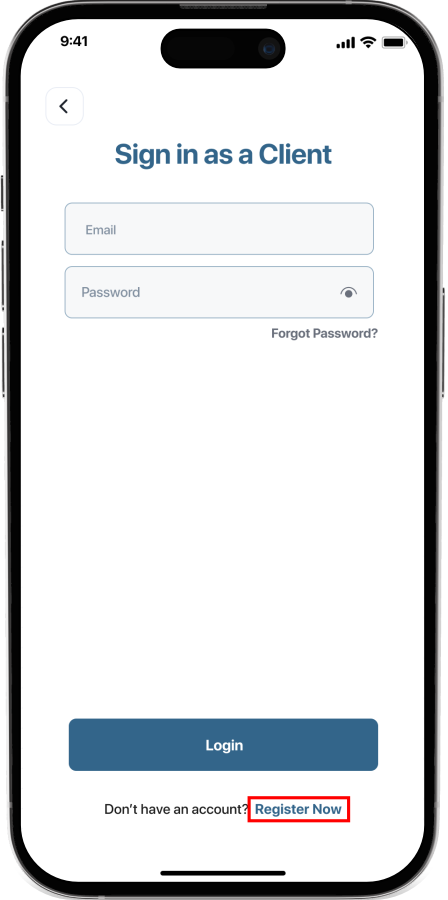
If you don’t have an account, tap on Register Now to register as a client. Then follow the prompt.
- Account Activation

After registration, you are meant to verify your profile with your Bank Verification Number (BVN) to access full feature of the app.
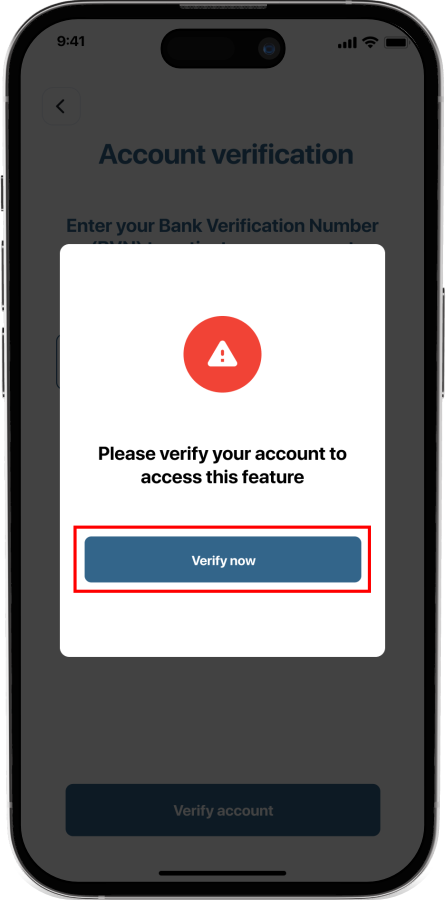
If you click on any feature before verification, this page comes up to take you through the verification step.
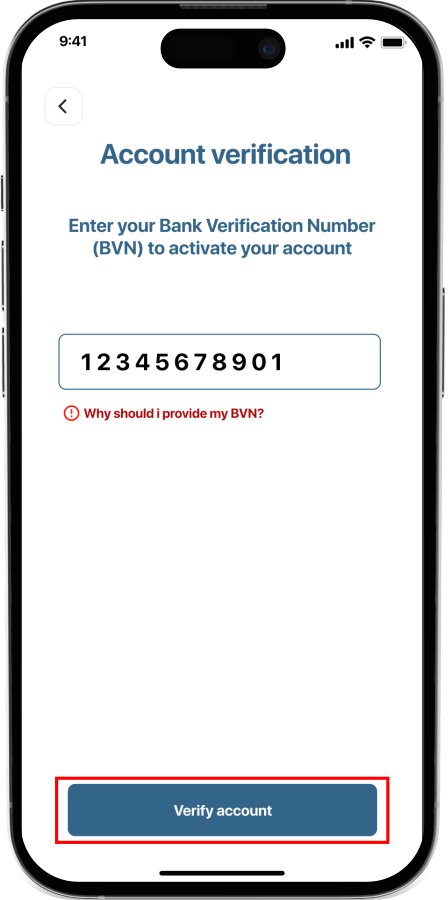
Your BVN is needed to ensure authenticityof each users and make security a vital practice for all users. Provide your BVN in the text box and tap on Verify Account.
- Client Dashboard and Professional Search
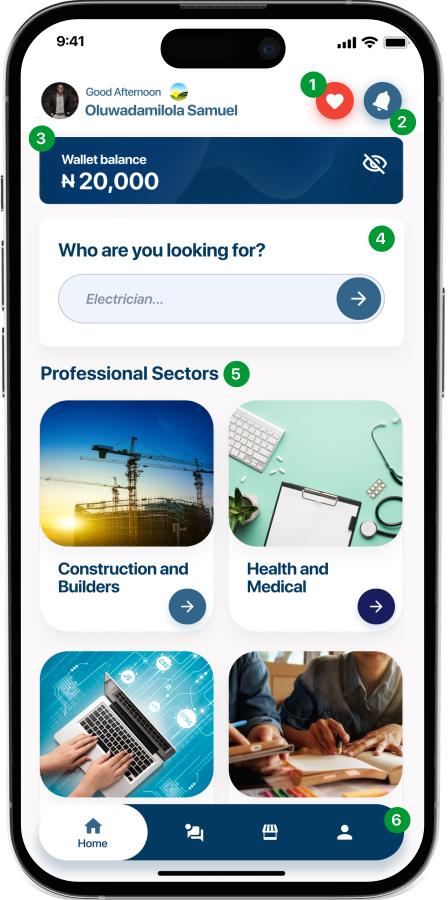
- Favourites: This icon leads to a page where the professionals you love are listed
- Notification Bar: This leads to the notifications page
- Wallet Balance: This displays your wallet balance and lead to the wallet page
- Search Bar: You can search the professional you need in the bar.
- Professional Sector: You can select the professional you want by their respective sector
- Navigation Bar: The navigation bar leads you to Home Page, Chat page, Marketplace page and your profile page. However, you can’t access the Chat page and Market place if your account it not yet verified.
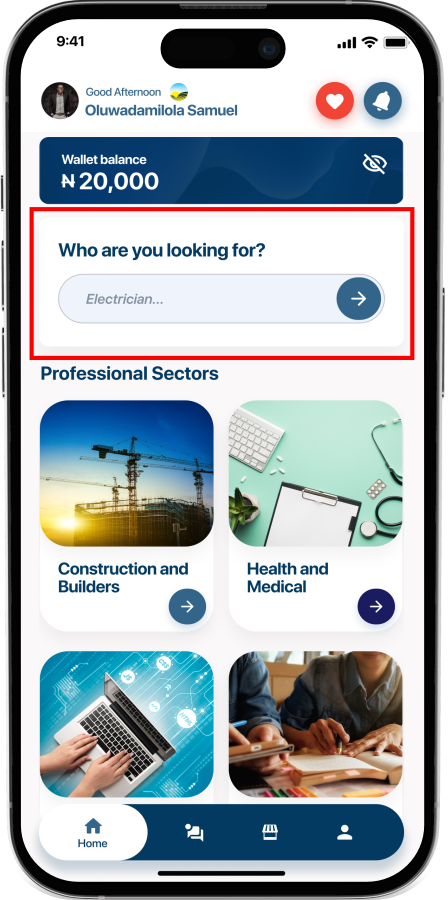
In the Search Bar, type the professional you need and tap the arrow button. You can also browse through the professional sectors and tap the arrow on the sector of your choice.

Open the search result, you can switch the tab to view all cooperate bodies and professionals that matches your search. You can also use the Sort icon to sort your search result by Location, Availability and Ratings.
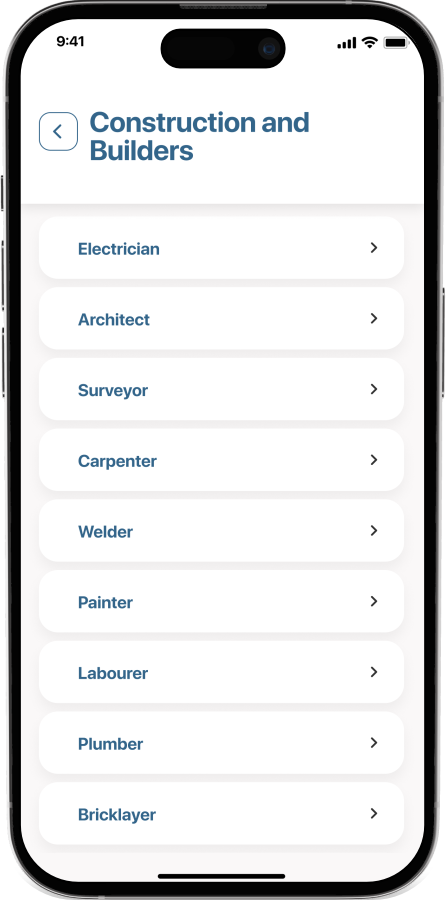
If you go through the professional sector, there is a list of all professionals and you can select the professional you want to hire.

After selecting the professionals you want or searching, tap on any professional you would like to engage for your project/job to view their profile.
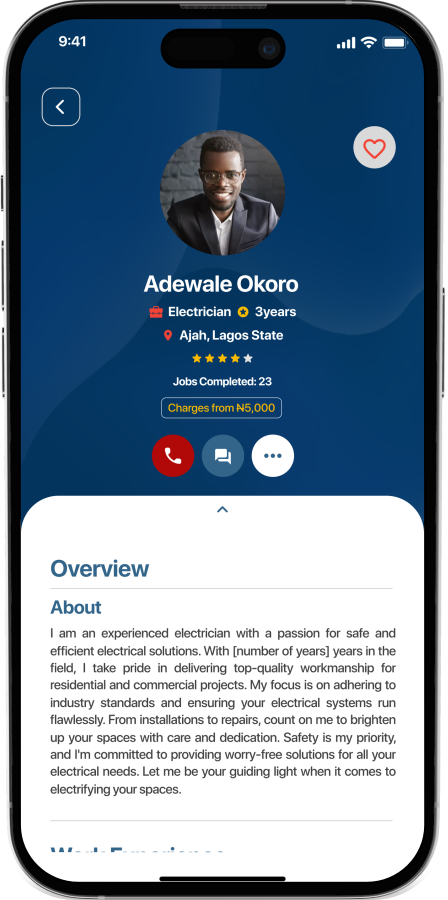
On the profile page of a professional are the overview of their work, work history, experience, etc. You can start a chat with them by tapping on the chat icon, add them to your favourite list, call, etc.

To you hire a professional on Acepick, you will have to chat with them and discuss the job/project at hand.
- Invoice Approval and Hire

After due conversation with your preferred professional, they will create an invoice and send to you. You can download the invoice in form of a pdf file or tap the icon highlited to view the invoice list.
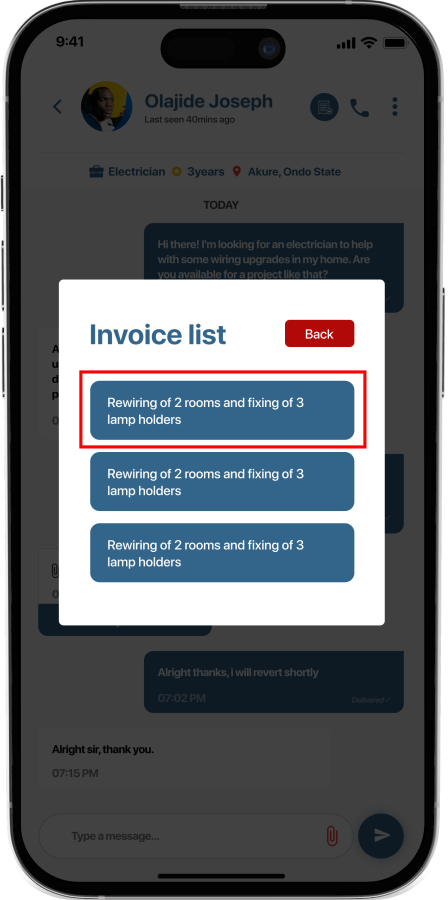
All invoice send to you by the professional are listed here. Please note that you can only view an invoice between you and a client by going to the chat between you both then tapping the invoice icon.
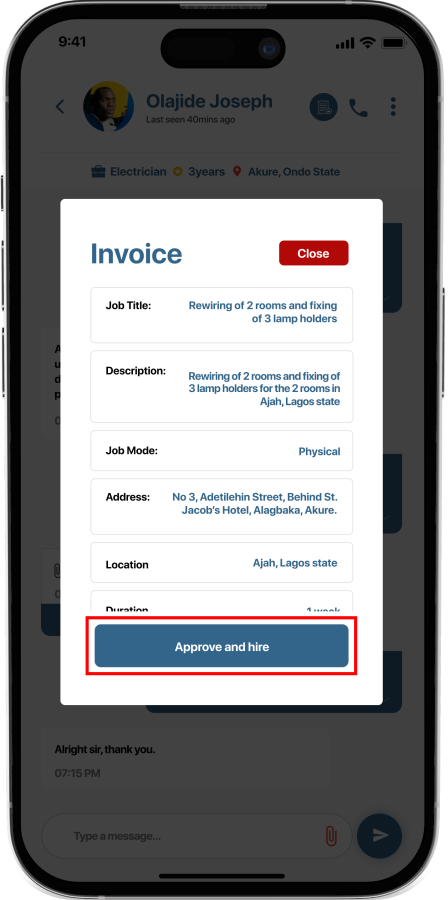
After you have choosen an invoice from the invoice list, then you can see the contents in the invoice. As a client, the hiring process starts from this invoice, you either approve this invoice or you request for another one if you are not satisfied yet.
Please note that a project that requires materials will have to be indicated in the invoice with all materials needed, the quantity, price and the totals. A professional will state it in the invoice if a client will pay for this materials or the professional. In the case where the professional pays, a client is meant to pay for both the workmanship and the material on the app. In the case where a client pays, then the client is meant to pay only the workmanship and expected to get the materials from his/her end.
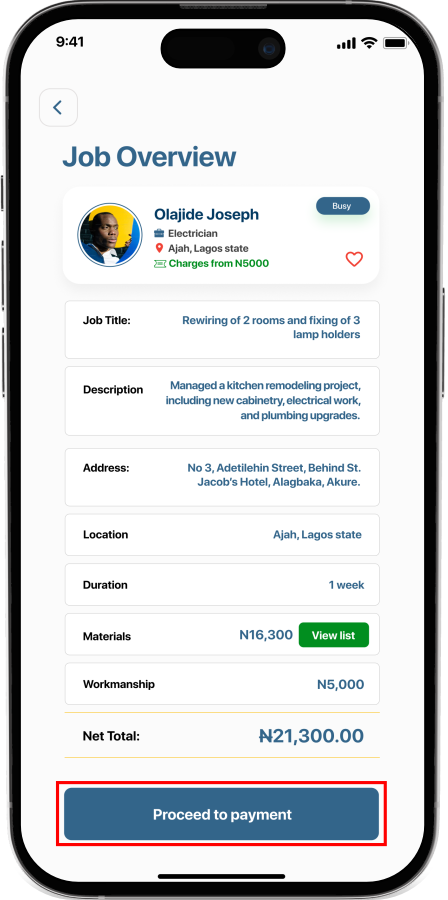
Upon the clients approval on an invoice, the job interview page opens for the client to make payment. The client is advised to go throught the invoice thorougly once more before payment.
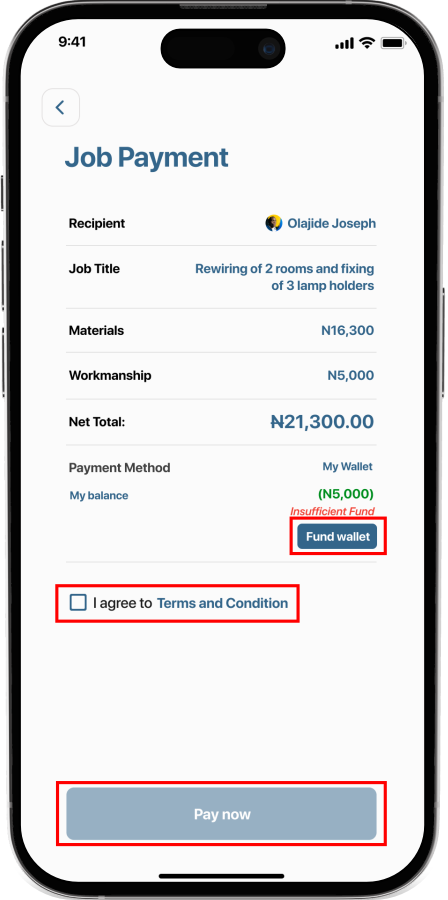
The client will have to read and agree to the terms and condition before paying for this job. Incase the wallet balance is insufficient. The Fund wallet button appears only when the client’s wallet balance is insufficient for the job so the client can tap on the button and follow prompt.
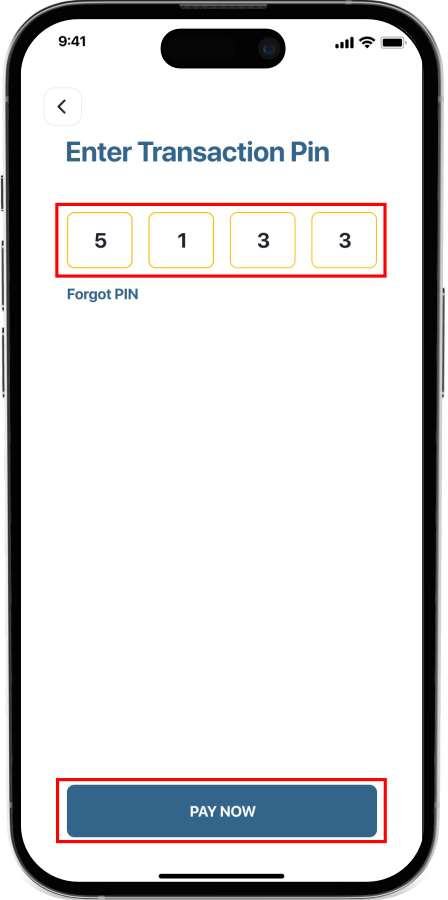
For the final approval of this hire process, the client will be asked to enter his/her transaction pin, they will also be prompted to create one if it is their first time performing such transaction. After the pin is provided, then you can tap on PAY NOW.
- Job; Follow up, Meetings and Approval
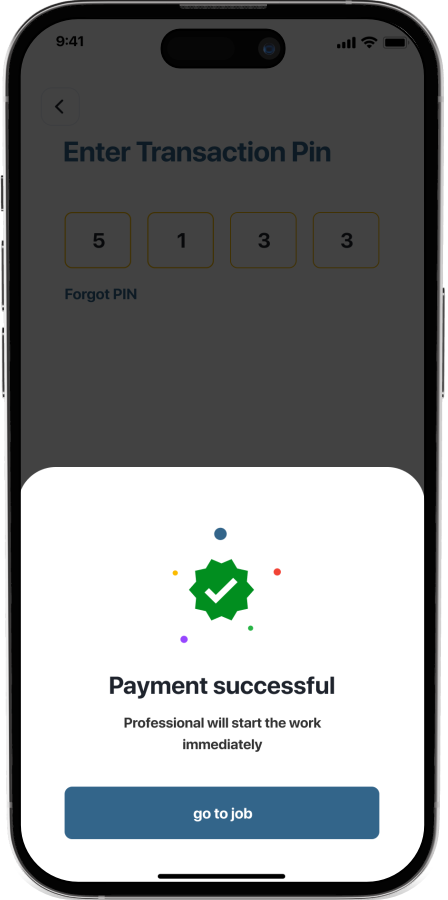
After successful payment, tap on “go to job” to go the job for follow up.

For a Physical job, the job will immediately be moved to pending jobs until the professional has come to meet the client, i.e. when the arrival location is checked.

For a pending job, the client waits for the professional to arrive, however, the client has the option to cancel the job if the professional failed to arrive, the money will be refunded to the client’s wallet and the professional will be notified of the cancellation of the job. Meanwhile the client is required to state the reason for this cancellation. The Professional too can give a review to the event.

The client is expected to fulfill the location check if the professional arrives. Tap on the Location check highlighted above.
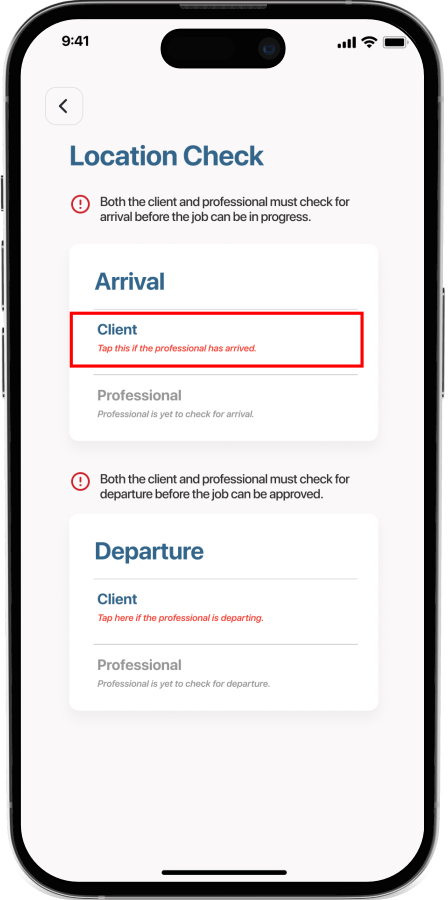
The client is expected to tap the Client section for the arrival and ensure the professional does the same in order for the job to move to Jobs in Progress.

In cases where the client and professional has to meet more than once, they have to reset their location and check newly to update their location and time on our server for security reasons and future investigations.

After all job activities, when the client is satisfied, they will approve the job and the money will be sent to the professional. However, the client can reject the job of which they will be required to state reasons. The money will not be returned to the client after 3days if the professional didn’t file for a divorce.

After successfuly approval of a job, you will be prompted to leave a review for the professional or close. It is advisable to leave a review as this will guide the next clients that are willing to hire the same professional.

Leave a review for the professional, you can type the commment and give rating stars from 1 to 5.
Professional
- Login/Register
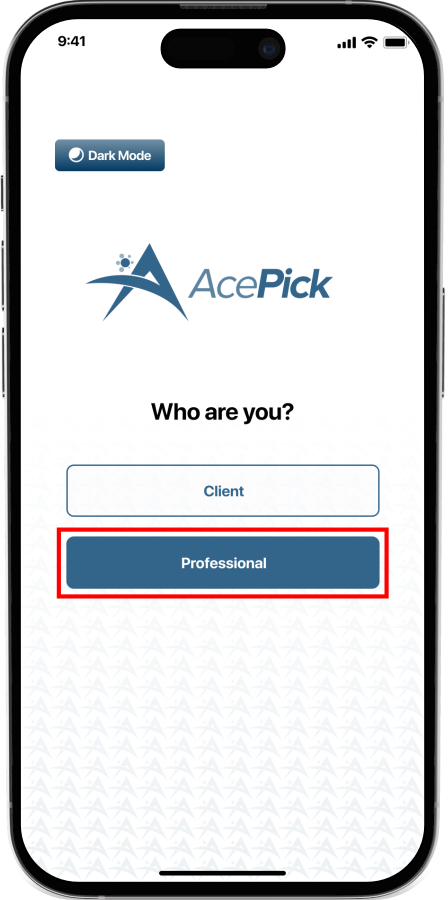
After the Splash screen, this page appears, as a Professional, you will tap on “Professional”. You can tap the Dark mode button at the top left to switch to dark mode.
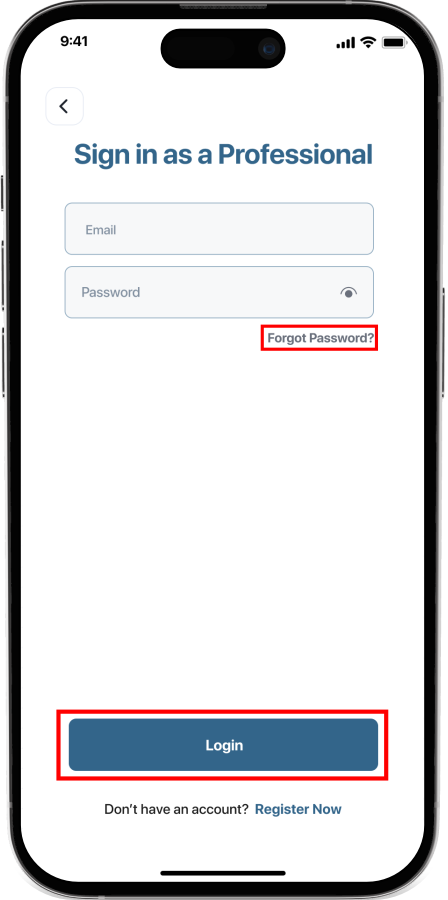
Provide your login credentials to login to your dashboard of the app. Tap forgot password to reset your password if you cant remember your password.
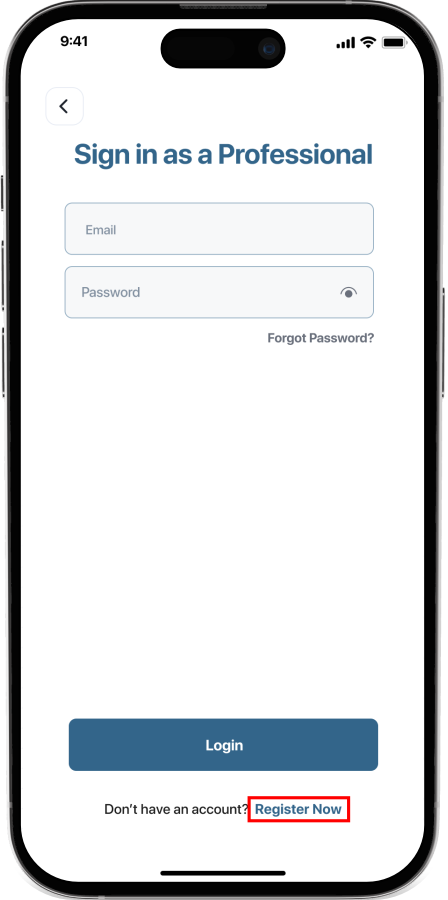
If you don’t have an account, tap on Register Now to register as a Professional. Then follow the prompt.
- Account Activation

After registration, you are meant to verify your profile with your Bank Verification Number (BVN) to access full feature of the app.

If you click on any feature before verification, this page comes up to take you through the verification step.

Your BVN is needed to ensure authenticityof each users and make security a vital practice for all users. Provide your BVN in the text box and tap on Verify Account.
- Professional Dashboard and Profile Setup
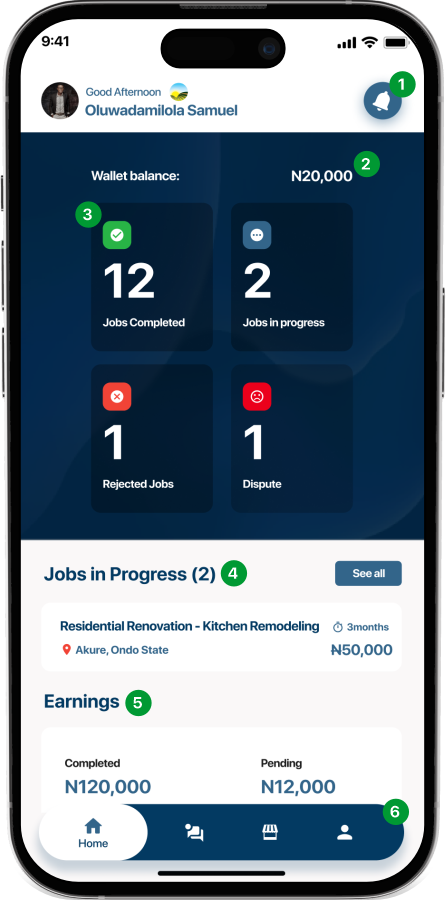
- Notification Bar: This leads to the notifications page
- Wallet Balance: This displays your wallet balance and lead to the wallet page
- Jobs Stats: Jobs stats are displayed here.
- Jobs in Progress Tab: This shows the most recent job in progress and a button that leads to the job in progress page
- Earning Stats Bar: This displays your earnings stats
- Navigation Bar: The navigation bar leads you to Home Page, Chat page, Marketplace page and your profile page. However, you can’t access the Chat page and Market place if your account it not yet verified.
As a professional/Corporate Body, it is very important to keep your profile updated to convince client to hire you. Acepick has both professionals and corporate bodies. To create a Corporate Body account, you will have to first register as an individual professional, then create a corporate body profile from your profile settings. Acepick doesn’t support the bidding system, which means clients browse through a list of professionals themselves and start a conversation. After your first hire, the rating you will get will also compliment your ability to get hired.
- Professional Profile Setup
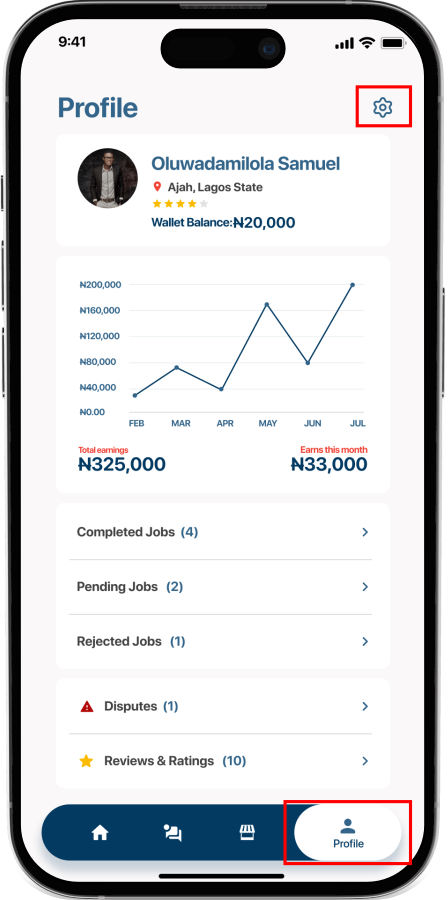
In the Navigation bar, tap on Profile to get to this page. The profile page shows your profile summary including your earnings and job stat. Tap on the profile setting at the top right corner to set up your profile.
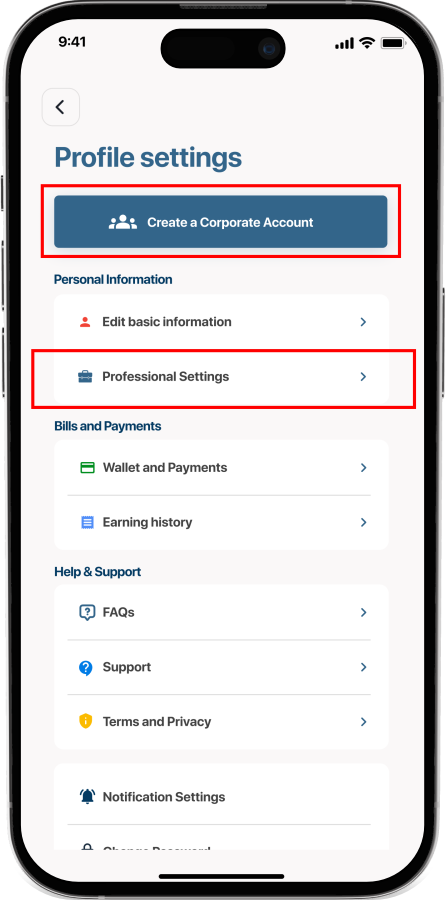
To create a Corporate Body account, tap on Create a Corporate Account and follow prompt. To update your professional settings, tap on Professional Settings. There are several settings in the profile settings page.
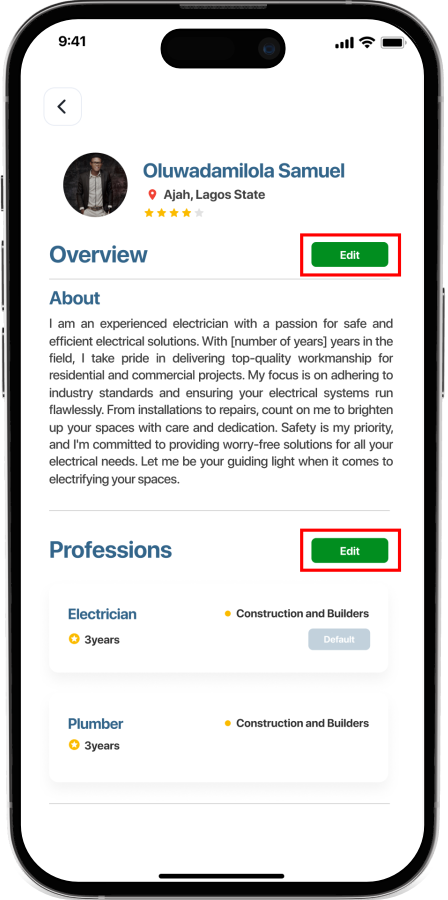
In the professional settings page, there are divided sections you can edit to suite your taste. Update them with your information and watch out for a chat from a client who is willing to hire you.
- Chat and Client Profile
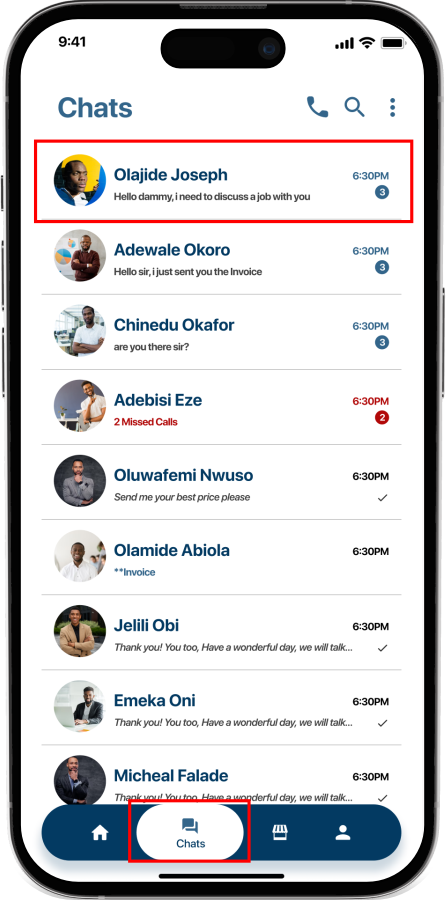
You will be notified if you receive a message, tap the Chat icon in the Navigation bar to go to the chats page, then the most recent message with will at the top, tap on the new message to open it.
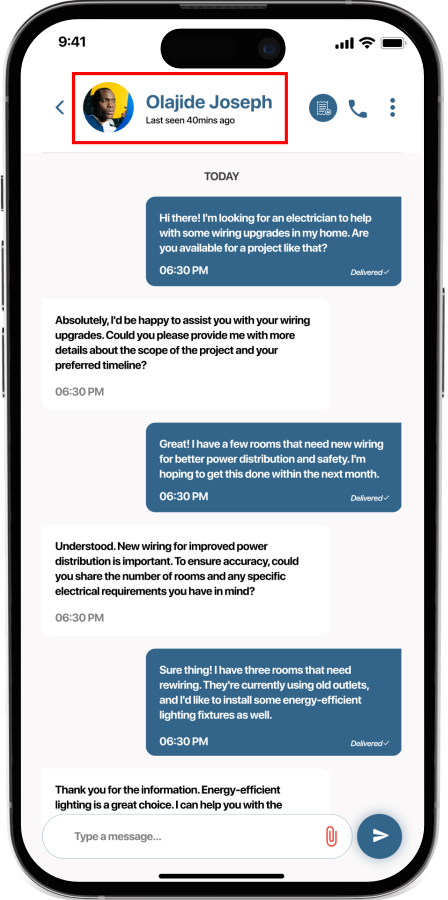
This is the conversation page between you and the client, you and the client are to discuss about the project/job. Tap the Name of the client highlighted as in the picture above to view the client profile.
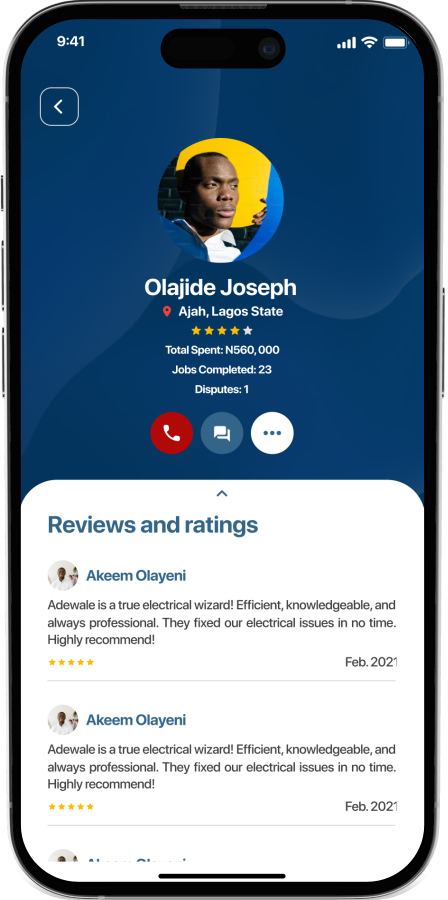
This is what the client’s profile look like.
- Invoice Creation

From the Chat page, Tap the invoice icon at the top as highlighted above to open the Invoice overlay.

To create invoice to create a new invoice to be sent to your client. Tap view invoice list to view the invoice you have sent earlier.

Select your Job mode, either Physical or Virtual, you don’t need to select the location if your job is virtual, eg. Graphic Design.
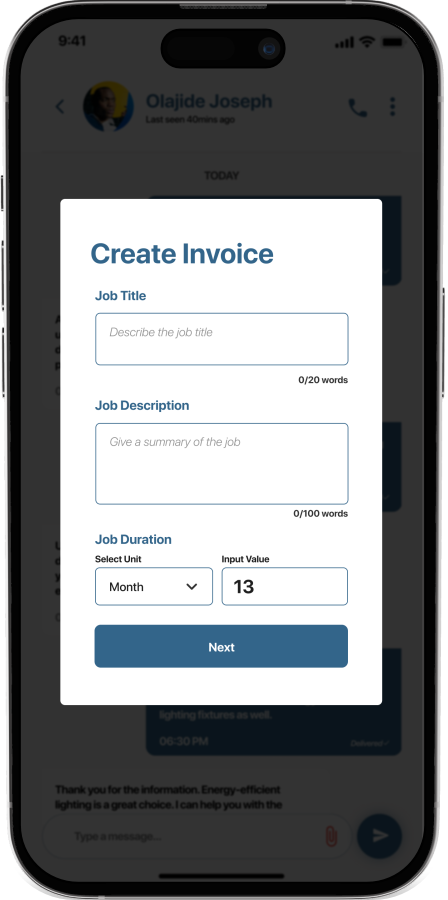
Input Job Title, Description and Job Duration.
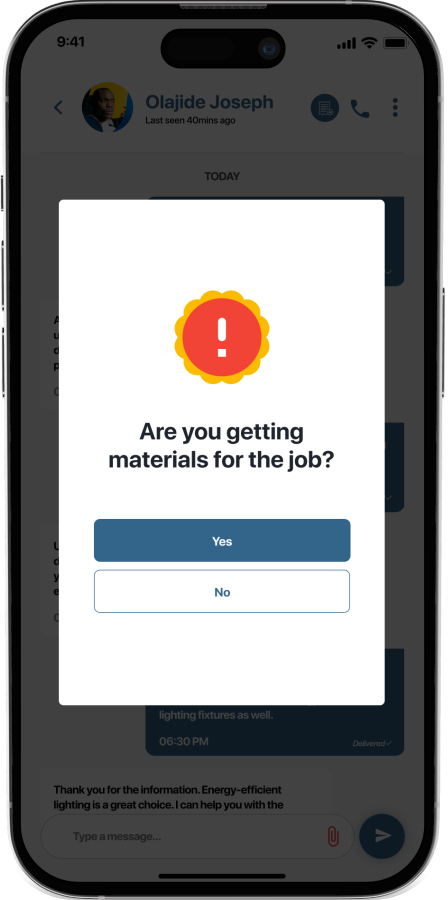
Select Yes if you the job has to do with materials to be bought, Tap no if it doesn’t.

Tap Add Item to add job materials
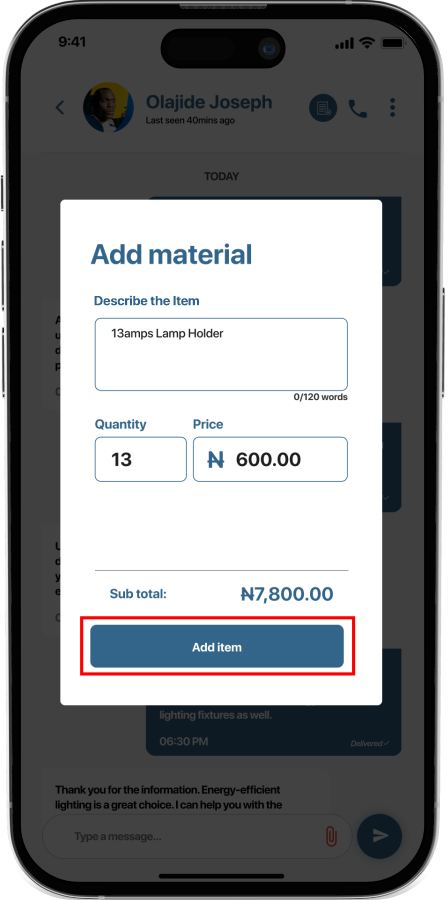
Type in the details of the material, the quantity and the price
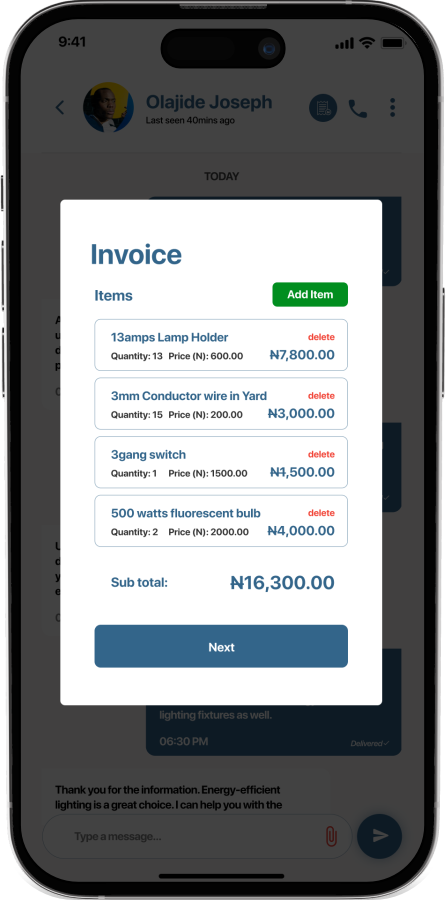
After you are done creating the Materials list, Tap on next
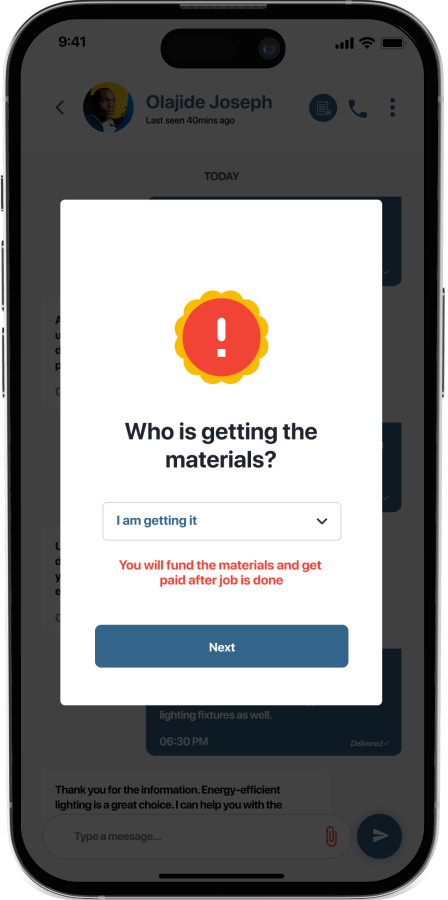
Select who is getting the materials you created. If you select “I am getting it” this means you will fund the materials and your client will pay it after the work is done. If you select that the client is getting it, it means the client will fund it.
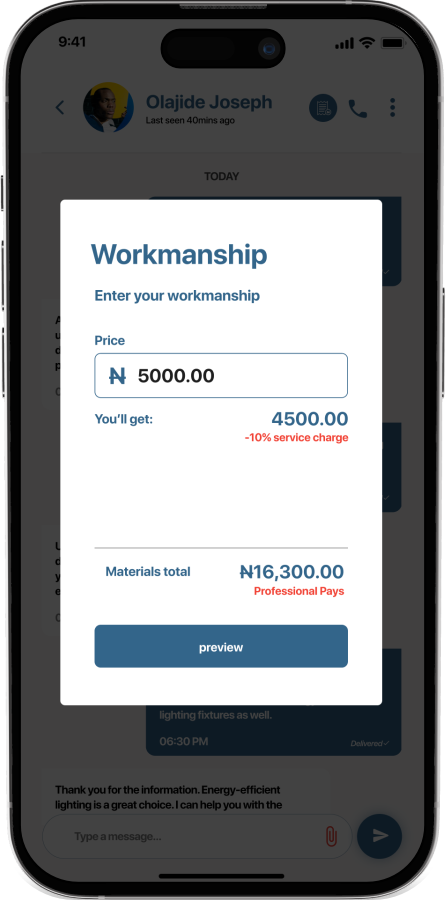
Input your Workmanship for the job. The amount you will get will be automatically calculated.
Please note that a project that requires materials will have to be indicated in the invoice with all materials needed, the quantity, price and the totals. A professional will state it in the invoice if a client will pay for this materials or the professional. In the case where the professional pays, a client is meant to pay for both the workmanship and the material on the app. In the case where a client pays, then the client is meant to pay only the workmanship and expected to get the materials from his/her end.
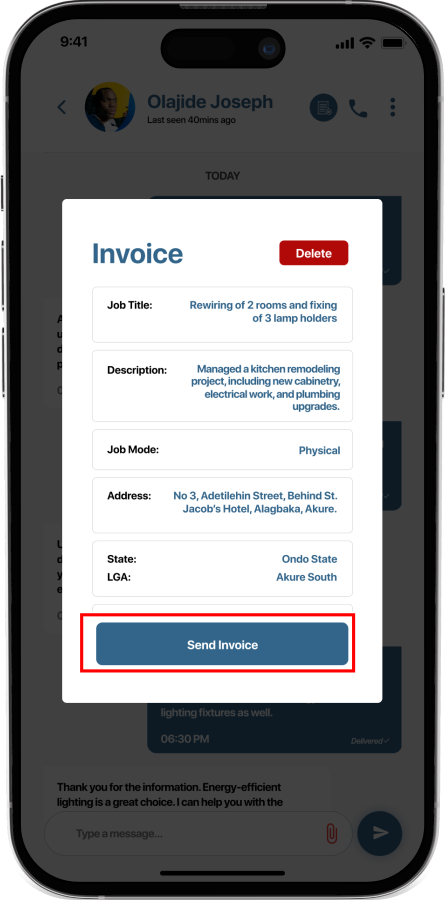
This page previews the invoice, after you are done previewing, you can tap on send invoice to send it to the client.
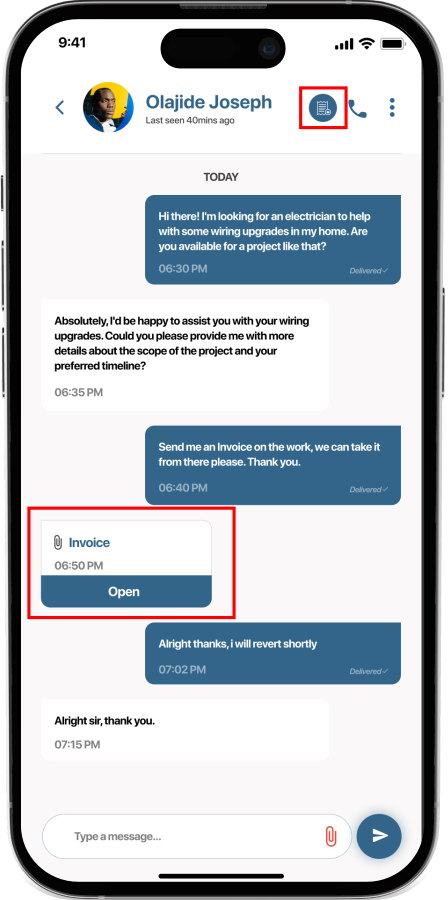
You will see the invoice sent to the client in form of a document, meanwhile you can view the invoice when you tap on invoice icon at the top menu, then “view invoice list”.

The invoice you sent is listed here. The client will preview, if there is a need to add more items, the client will ask you to create a new one till the client is satisfied and approves the invoice.
- Invoice Approval, Location check and Job Approval.
- Pending Job: This is only applicable to Physical jobs. A Job is pending when the invoice has been approved by the client and the Professional is yet to fulfill the location check to ensure they has met.
- Job in Progress: A job is in progress once the location check has been fulfilled for physical jobs and when an invoice has been approved for virtual job.
- Completed Job: When a job is approved by the client, then the job is completed and will be under completed jobs in your profile.
- Cancelled Job: When a physical job has been pending for a while and the client has ran out of patient while waiting for the professional, the client can cancel the job and go in-search for another professional. Such job is found under canceled jobs and are only applicable to physical jobs.
- Rejected Job: When a client is not satisfied by the work from a professional, the client can reject the job and this will be under rejected job. However, the client won’t be refunded till after 3days in order for a professional to file a dispute.
- Dispute: In a case where the client rejected a job which is dis-satisfactory to a professional, he/she can report a dispute on the job and our support will look into the issue. Such job will be under the dispute.
A professional is advised to meet the client at the expected discussed time has the client can cancel a pending job and would be refunded immediately. The pending job will be immediately moved to Job in Progress once the location check is fulfilled. However, this is only applicable to jobs that has to do with physical meetings. Virtual Jobs are automatically moved to Jobs in Progress after the invoice is approved.

A professional will be notified when a sent invoice has been approved by a client.

For a work that requires physical meetings between a client and a professional, at the approval of the invoice, the job will be in Pending Jobs until the professional has met the client and location has been checked. You can access that from your profile page, then pending jobs.
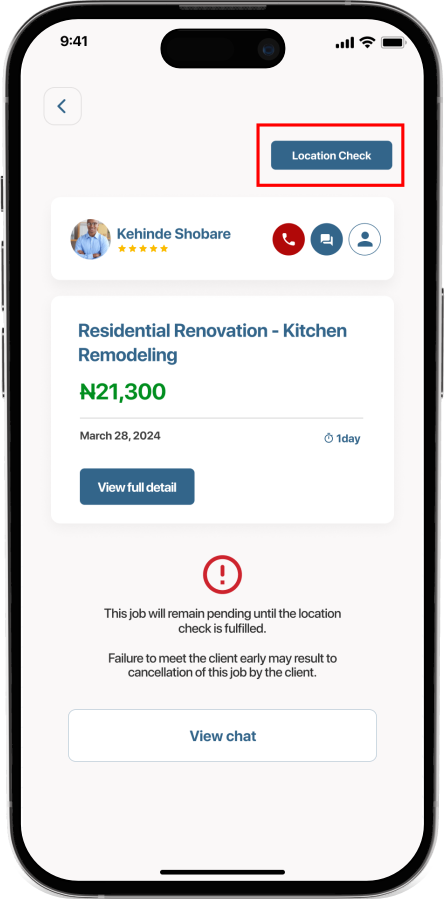
Tap on Location Check on the pending job to check your arrival with the client. Failure to check the location will leave the job to remain pending.
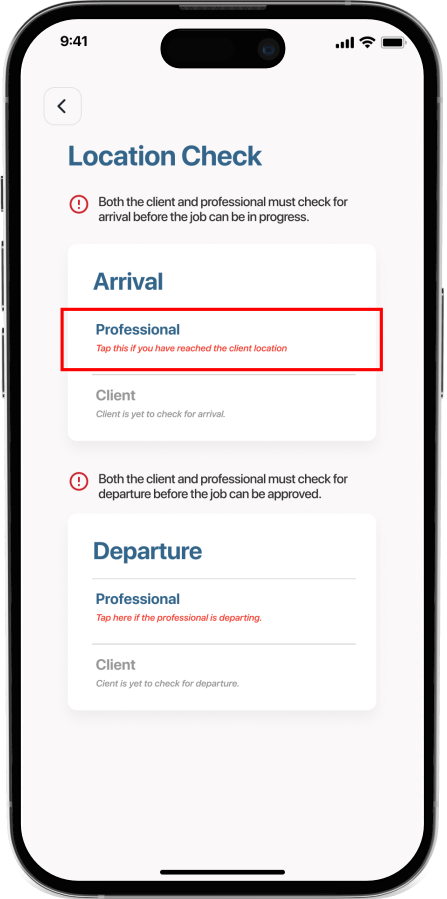
Tap on Professional for Arrival when you get to the client’s destination and likewise for the departure. Your location will be sent to our server to aid tracking in case of emergency.

Both the client and the professional must check the Arrival before the job can now be in Progress. Tap on Jobs in Progress to proceed with the job. They also required to check the departure before the client would be able to approved/reject the job.

A pending job will now be moved to Jobs in Progress after the location has been checked for arrival. Tap on the arrow button on each job to view all details of the job.
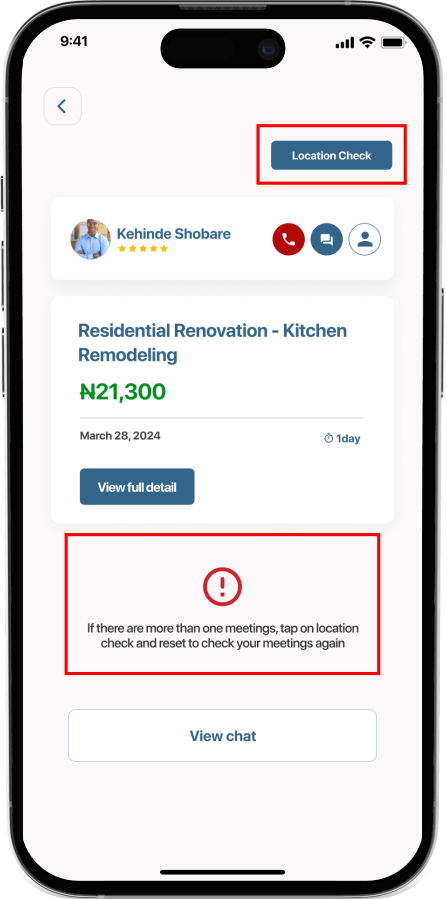
In cases where the client and professional are meeting more than once, they must check the location. Tap on location check to view the location check page.
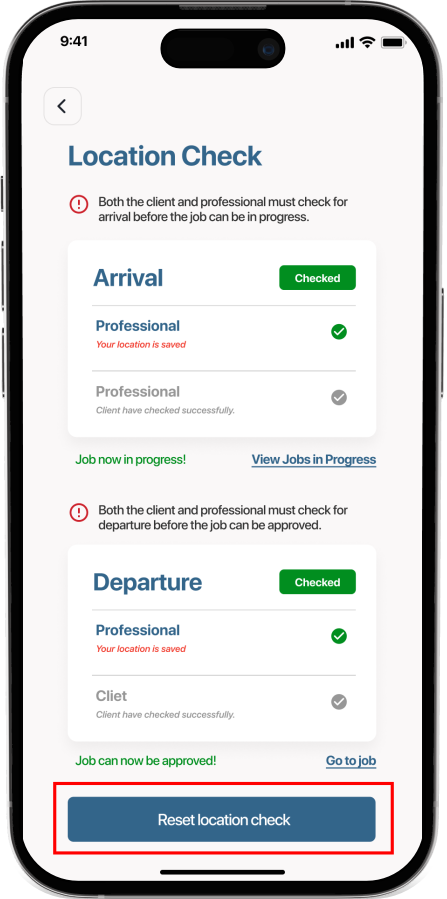
They are to reset the location check in order to fulfil the next location check for the next meeting. The new location will be sent to our server for security purpose.
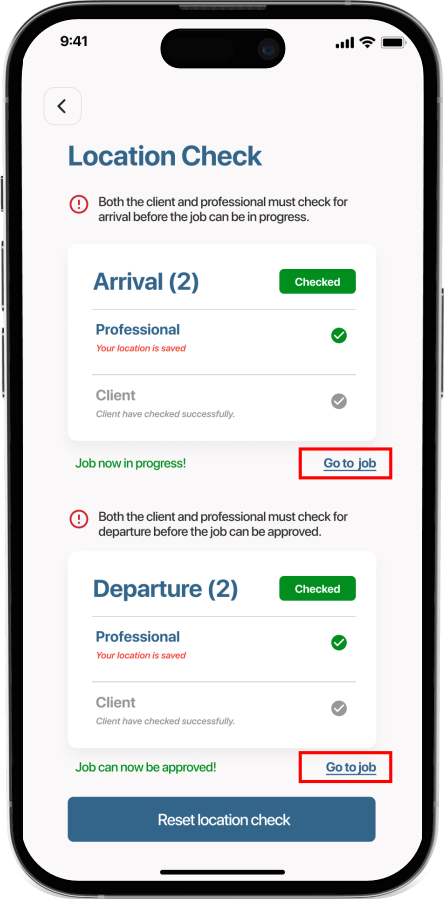
As seen above, Arrival (2) means the client and professional has meet twice.
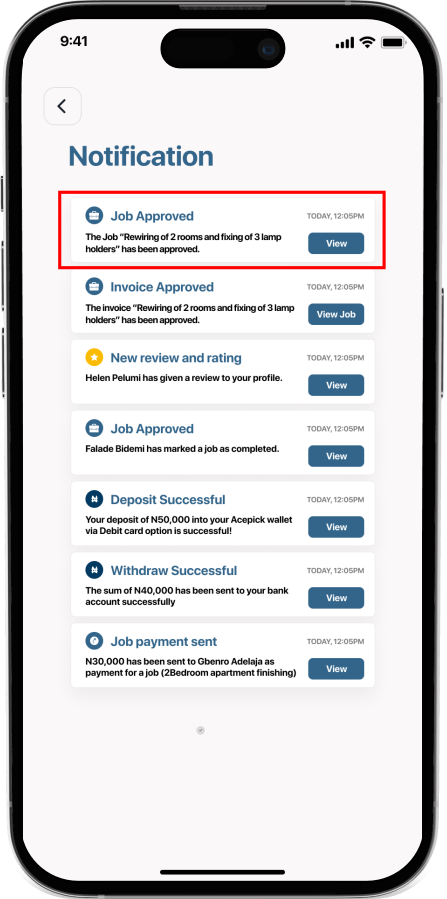
When the client finally approves the job, the professional will be notified. You can also view the job under Completed Jobs from your profile. The money would have been sent to your wallet.

You can close or leave a review for the client, this will help the future professionals to know what working for the client is like.
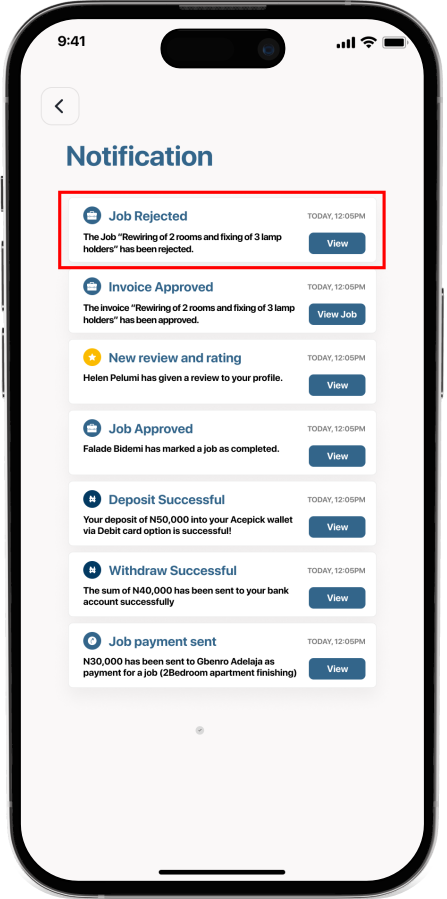
In a case where the job is rejected by the client, the professional will be notified and he has the opportunity to file for a dispute.
Market Place
- Marketplace Interface
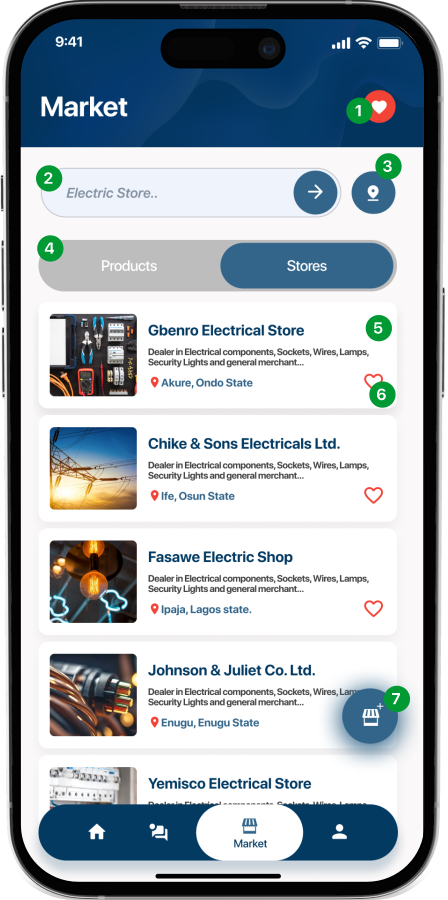
- Favourites: This leads to a page where your favourite Stores or Products are listed.
- Search Bar: You can search for the product or services you want here, all stores and products relating to your search string appears when you tap on the arrow key.
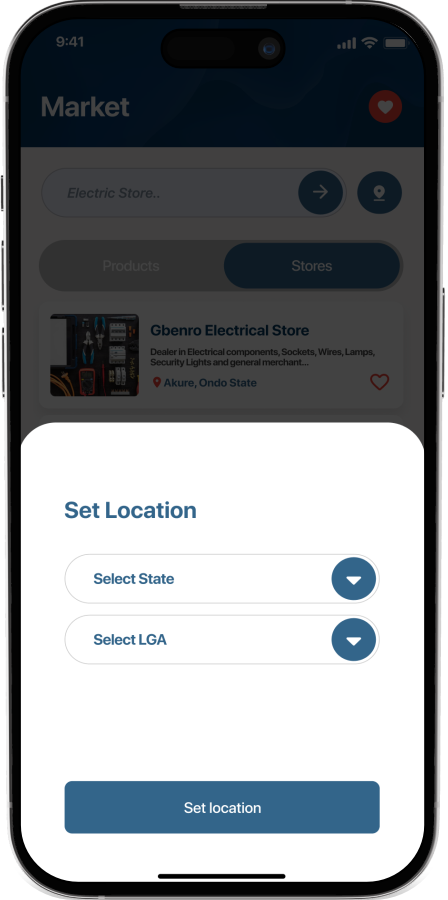
- Sort Button: You can sort the products or stores you want to view by location by tapping on this button.
- Store/Product Tab: You can switch between stores and products using this tab
- Store: A store is an online shop where that displays what they sell on Acepick.
- Viewing Products and Stores

After the Splash screen, this page appears, as a Professional, you will tap on “Professional”. You can tap the Dark mode button at the top left to switch to dark mode.
Provide your login credentials to login to your dashboard of the app. Tap forgot password to reset your password if you cant remember your password.
If you don’t have an account, tap on Register Now to register as a Professional. Then follow the prompt.
- Product and Store
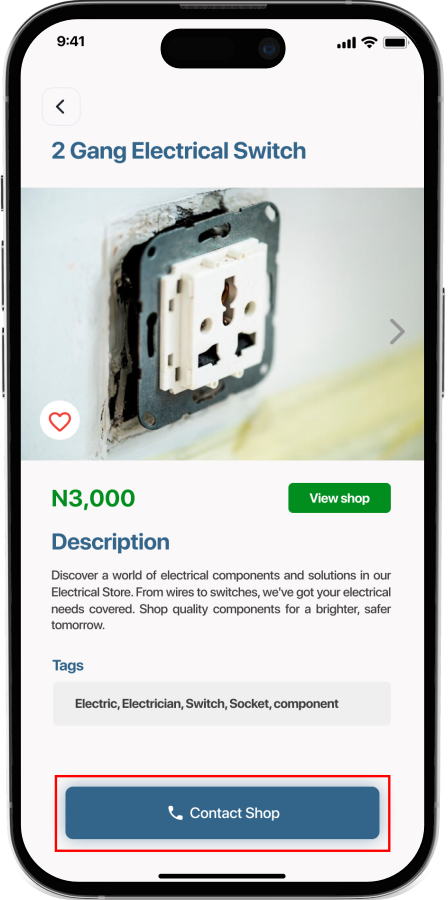
When you tap on a single product, this page opens, it shows the images of the product, the shop, description, tags and contact. Tap on Contact Shop to show the contact number of the shop.
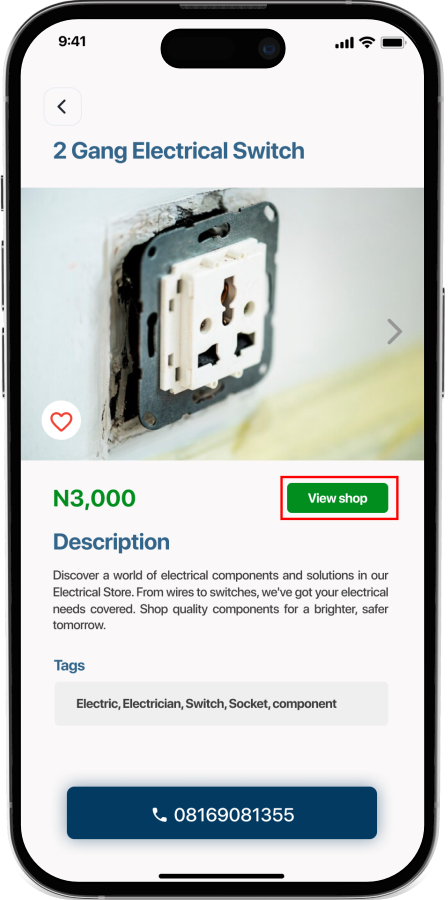
Tap on View shop button to view the shop profile.
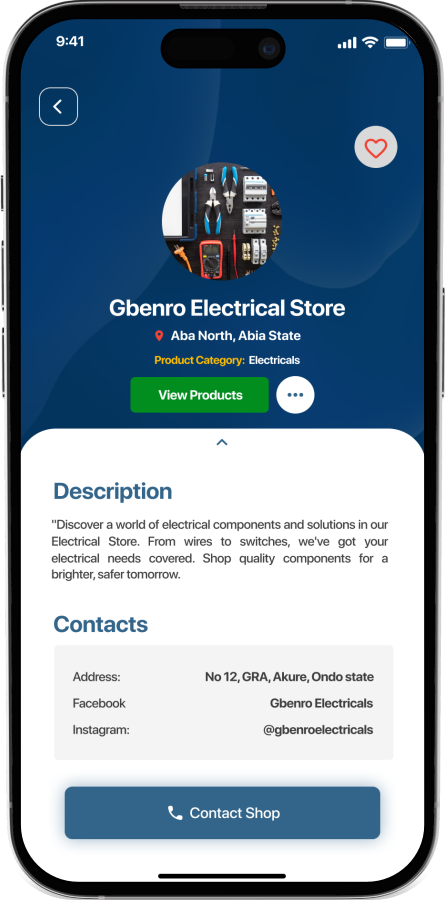
This is what the shop profile looks like. It shows all information about the shop. You can view all products from the shop by tapping View Products. You can also report or give review to the shop when you tap the 3-dots beside the view products button. You can also add the shop to your favourite by tapping on the favourites button.
Acepick Market doesn’t support online order and payment yet, you can only view the available shops and products and contact the by their contact number.
- Shop Creation and Management
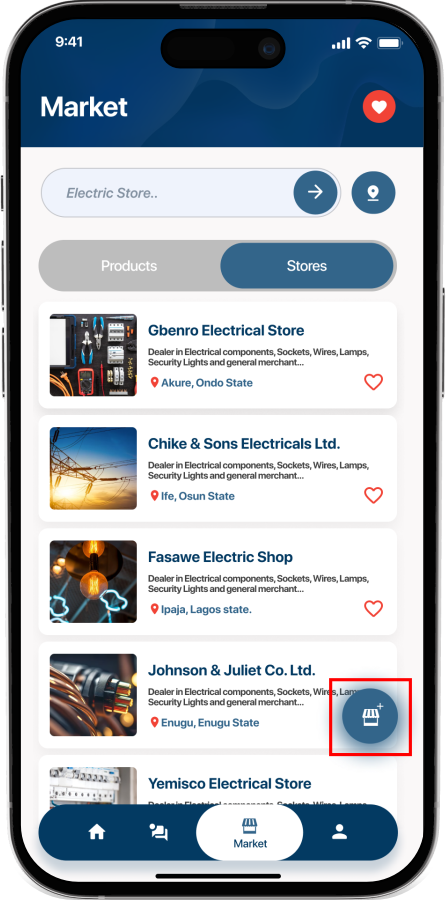
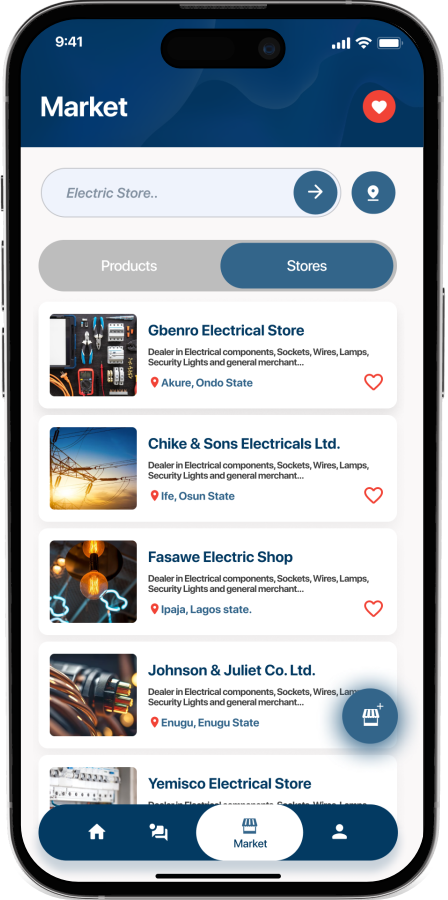
From the market home, Tap on the Stores tab, tap on the floating icon at the bottom right corner as highlighted above to create a store.
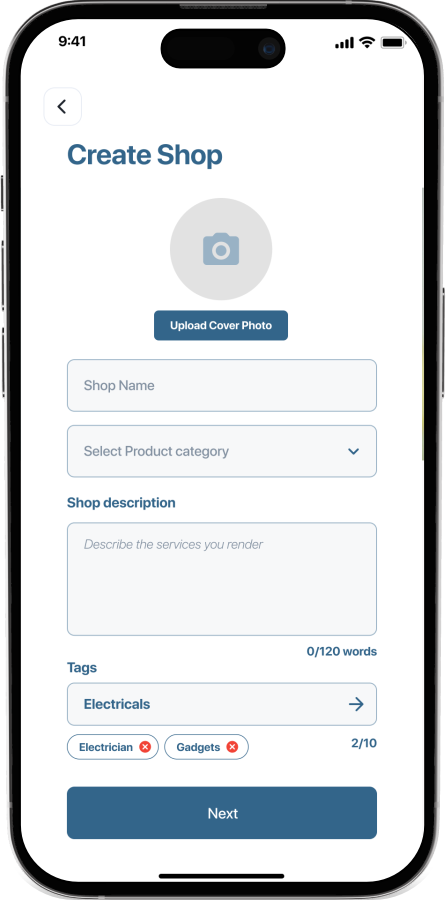
From the Create Shop page, fill in all details of your store including the tags. (Tags make it easy to search your store). Tap on next, upload pictures of your store and follow prompt. After all steps have been done, wait patiently for your shop to be approved by our support team.

After successful creation of your store and approval by our support team, There will be a Shop icon at the top right corner as shown above that leads to your store profile. Please note that this icon wont appear if you don’t have a store yet.

This is what your shop profile looks like. The highlighted button above is the shop status. Your should can be approved, unapproved or suspended, this will be determined by the support. Tap on My Products button above to view your products.
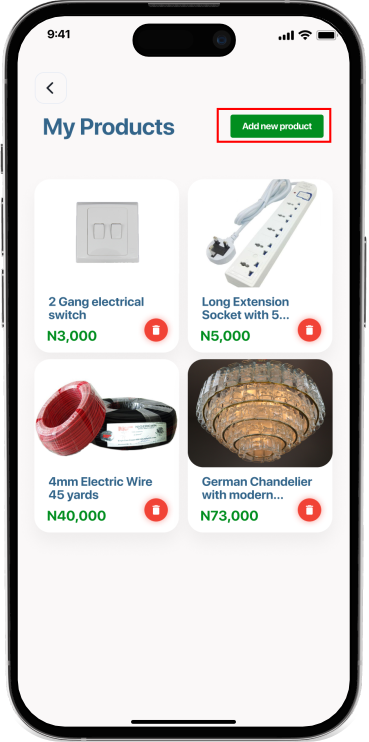
This is your products page. Tap on Add new product. Tap on any product you have created to open the page. You can also delete each product by tapping on the delete icon on each product.
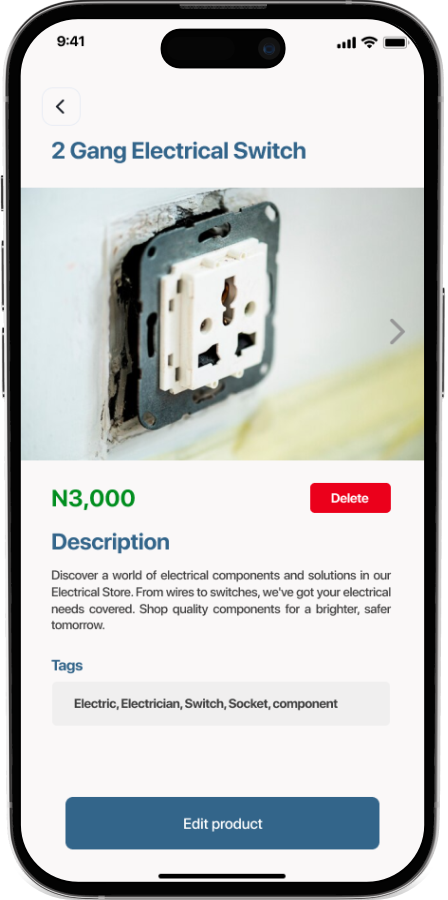
This is a single product page. You can edit the product and delete it from this page.